2016年9月27日 星期二

影像邏輯運算君_學習範例

同學好~

這次教大家一些基礎影像運算


影像(Image)可視為矩陣(Matrix)

涉及一或多張影像的陣列 (array)運算
是以一個像素接一個像素 (pixel-by-pixel) 為基礎來執行。


在這裡你會看到一個詞叫做  element-wise意思就是指

element by element

影像     對應     矩陣


像素     對應    矩陣成員(element)


示例影片:


兩張圖做 加 減 乘 或是 And 、OR等等的運算


另外就是  Absdiff  和  Sub 這兩個運算用法有點不一樣


這裡提供一個範例給大家回去做試驗喔!!!


切記兩張影像的大小要一樣

最好是用一個沒有人當背景之類的


一張有人(物件)   一張沒人(物件)


來觀察喔!!!


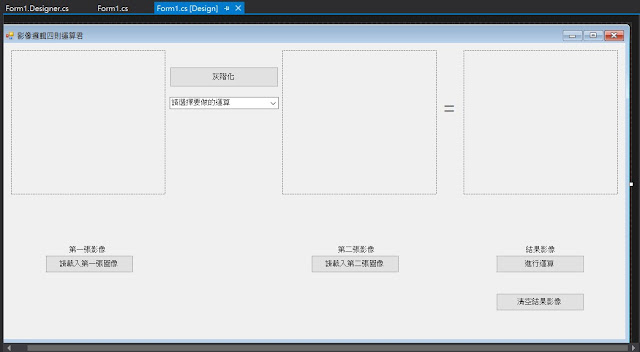
簡單視窗布局設計


代碼示例:


using System;
using System.Windows.Forms;
using Emgu.CV;
using Emgu.CV.Structure;
using Emgu.Util;

namespace 影像四則運算
{
    public partial class Form1 : Form
    {
        Image<Bgr, byte> img1;
        Image<Bgr, byte> img2;
        Image<Bgr, byte> imgResult;

        bool grayState = false;
        Image<Gray, byte> imgGray1, imgGray2;
        Image<Gray, byte> imgGrayResult;

        public Form1()
        {
            InitializeComponent();
        }

        private void Form1_Load(object sender, EventArgs e)
        {
        }
        private void button5_Click(object sender, EventArgs e)
        {
            grayState = true;            
            imgGray1 = img1.Convert<Gray, byte>();
            imgGray2 = img2.Convert<Gray, byte>();
            pictureBox1.Image = imgGray1.ToBitmap();
            pictureBox2.Image = imgGray2.ToBitmap();
        }

        private void button1_Click(object sender, EventArgs e)
        {
            OpenFileDialog Openfile = new OpenFileDialog();
            if(Openfile.ShowDialog() == DialogResult.OK)
            {
                img1 = new Image<Bgr, byte>(Openfile.FileName);
                pictureBox1.Image = img1.ToBitmap();
            }
        }

        private void button2_Click(object sender, EventArgs e)
        {
            OpenFileDialog Openfile = new OpenFileDialog();
            if (Openfile.ShowDialog() == DialogResult.OK)
            {
                img2 = new Image<Bgr, byte>(Openfile.FileName);
                pictureBox2.Image = img2.ToBitmap();
            }
        }

        //影像運算
        private void button3_Click(object sender, EventArgs e)
        {
            if(comboBox1.SelectedIndex == 0) //    加
            {
                if(grayState==true)
                {
                    imgGrayResult = imgGray1.Add(imgGray2);
                    pictureBox3.Image = imgGrayResult.ToBitmap();
                }
                else
                {
                    imgResult = img1.Add(img2);
                    pictureBox3.Image = imgResult.ToBitmap();
                }
            }
            if( comboBox1.SelectedIndex == 1)   //   減
            {
                if (grayState == true)
                {
                    imgGrayResult = imgGray1.Sub(imgGray2);
                    pictureBox3.Image = imgGrayResult.ToBitmap();
                }
                else
                {
                    imgResult = img1.Sub(img2);
                    pictureBox3.Image = imgResult.ToBitmap();
                }                
            }
            if(comboBox1.SelectedIndex == 2)// 乘
            {
                if (grayState == true)
                {
                    imgGrayResult = imgGray1.Mul(imgGray2);
                    pictureBox3.Image = imgGrayResult.ToBitmap();
                }
                else
                {
                    imgResult = img1.Mul(img2); 
                    pictureBox3.Image = imgResult.ToBitmap();
                }                
            }
            if (comboBox1.SelectedIndex == 3)//  AbsDiff
            {
                if (grayState == true)
                {
                    imgGrayResult = imgGray1.AbsDiff(imgGray2);
                    pictureBox3.Image = imgGrayResult.ToBitmap();
                }
                else
                {
                    imgResult = img1.AbsDiff(img2);
                    pictureBox3.Image = imgResult.ToBitmap();
                }                
            }
            if(comboBox1.SelectedIndex == 4) //  and
            {
                if (grayState == true)
                {
                    imgGrayResult = imgGray1.And(imgGray2);
                    pictureBox3.Image = imgGrayResult.ToBitmap();
                }
                else
                {
                    imgResult = img1.And(img2);
                    pictureBox3.Image = imgResult.ToBitmap();
                }                
            }
            if(comboBox1.SelectedIndex == 5) // or
            {
                if (grayState == true)
                {
                    imgGrayResult = imgGray1.Or(imgGray2);
                    pictureBox3.Image = imgGrayResult.ToBitmap();
                }
                else
                {
                    imgResult = img1.Or(img2);
                    pictureBox3.Image = imgResult.ToBitmap();
                }                
            }
            if(comboBox1.SelectedIndex == 6) // Xor
            {
                if (grayState == true)
                {
                    imgGrayResult = imgGray1.Xor(imgGray2);
                    pictureBox3.Image = imgGrayResult.ToBitmap();
                }
                else
                {
                    imgResult = img1.Xor(img2);
                    pictureBox3.Image = imgResult.ToBitmap();
                }                
            }
        }

        private void button4_Click(object sender, EventArgs e)
        {
            imgResult = null;
            pictureBox3.Image = null;
            grayState = false;
        }


    }
}


使用到的運算方法


element-wise add  對應元素數值相加


element-wise subtract 對應元素數值相減


element-wise multiply 對應元素數值相乘


計算兩影像的相減結果


element-wise AND 對應元素數值做AND運算


element-wise OR 對應元素數值做OR運算


element-wise XOR 對應元素數值做XOR運算


範例下載連結

https://www.dropbox.com/s/ev44lziv32zsju7/%E5%BD%B1%E5%83%8F%E5%9B%9B%E5%89%87%E9%81%8B%E7%AE%97.7z?dl=0


2016年9月18日 星期日

如何對視訊(連續影像)做不同色彩空間轉換_去噪技巧_膚色偵測_開關切換的程式邏輯_流程圖設計

簡易型(基礎)介面


基礎(簡易)設計流程圖架構

練習一下  畫流程圖喔!!!

這裡我只是簡易示範


代碼示例 :


第一階段 _ 解決Camera開啟

效果示例

代碼


using System;
using System.Collections.Generic;
using System.ComponentModel;
using System.Data;
using System.Drawing;
using System.Linq;
using System.Text;
using System.Threading.Tasks;
using System.Windows.Forms;
using Emgu.CV;
using Emgu.CV.Structure;
using Emgu.Util;

namespace emgucv_HSV_webcam
{
    public partial class Form1 : Form
    {
        #region Globle Var
        private Capture capture = new Capture();
        Image<Bgr, Byte> ImageFrame = new Image<Bgr, Byte>(320, 240);
        #endregion
        public Form1()
        {
            InitializeComponent();
        }

        private void btnOpen_Click(object sender, EventArgs e)
        {
            Application.Idle += ProcessFrame;
        }

        private void ProcessFrame(object sender, EventArgs e)
        {
            ImageFrame = capture.QueryFrame();
            ImageFrame = ImageFrame.Resize(pictureBox1.Width, pictureBox1.Height, Emgu.CV.CvEnum.INTER.CV_INTER_LINEAR);
            pictureBox1.Image = ImageFrame.ToBitmap();
        }
    }
}


第二階段 _ 不同色彩空間轉換


HSV 轉換

想像你家浴室的按鈕 (開/關)  ----> 正/反  去做 切換


這裡幫大家測出了  比較好的 針對黑色物件(體)的

低門檻值
//Hue:88,Satuation:0,value:11
高門檻值
//Hue:150,Satuation:255,value:255    


HSV部分做了三種效果

原始、做完中值濾波、做完平滑濾波的視訊效果

效果示例


using System;
using System.Collections.Generic;
using System.ComponentModel;
using System.Data;
using System.Drawing;
using System.Linq;
using System.Text;
using System.Threading.Tasks;
using System.Windows.Forms;
using Emgu.CV;
using Emgu.CV.Structure;
using Emgu.Util;

namespace emgucv_HSV_webcam
{
    public partial class Form1 : Form
    {
        #region Globle Var
        private Capture capture = new Capture();
        Image<Bgr, Byte> ImageFrame = new Image<Bgr, Byte>(320, 240);
        Image<Hsv, byte> imgHsv = new Image<Hsv, Byte>(320, 240);
        private bool hsvButton;
        private bool RgbButton;
        private bool YCbCrButton;
        #endregion
        public Form1()
        {
            InitializeComponent();
        }

        private void btnOpen_Click(object sender, EventArgs e)
        {
            Application.Idle += ProcessFrame;
            RgbButton = true;
            hsvButton = false;
        }
        
        private void ProcessFrame(object sender, EventArgs e)
        {
            //flag = 0;
            if (RgbButton)
            {
                ImageFrame = capture.QueryFrame();
                ImageFrame = ImageFrame.Resize(pictureBox1.Width, pictureBox1.Height, Emgu.CV.CvEnum.INTER.CV_INTER_LINEAR);
                pictureBox1.Image = ImageFrame.ToBitmap();
            }
            
            if(hsvButton)
            {
                imgHsv = capture.QueryFrame().Convert<Hsv,byte>();
                imgHsv = imgHsv.Resize(pictureBox1.Width, pictureBox1.Height, Emgu.CV.CvEnum.INTER.CV_INTER_LINEAR);
                //可以追蹤黑色物件
                Hsv lowerLimit = new Hsv(88, 0, 11); //Hue:88,Satuation:0,value:11
                Hsv upperLimit = new Hsv(150, 255, 255); //Hue:150,Satuation:255,value:255                
                imgHsv.Resize(pictureBox1.Width, pictureBox1.Height, Emgu.CV.CvEnum.INTER.CV_INTER_LINEAR);
                //imgHsv.SmoothGaussian(7);

                //原始HSV
                //pictureBox1.Image = imgHsv.InRange(lowerLimit, upperLimit).ToBitmap();

                //做完中值濾波(非線性濾波)後,必須是大於1的正奇數 ---> 去除雜訊常用
                pictureBox1.Image = imgHsv.InRange(lowerLimit, upperLimit).SmoothMedian(3).ToBitmap();

                //做完3*3平滑 ---> 平均平滑
                //將每個像素替換為相鄰矩形內像素的平均值,以3×3大小的核心來說,每個像素權重是1/9
                //用這些像素的加總,替換當前的像素值
                //pictureBox1.Image = imgHsv.InRange(lowerLimit, upperLimit).SmoothBlur(3,3).ToBitmap(); 


                //Image<Gray, byte> imgGray = capture.QueryFrame().Convert<Gray, byte>();
                //pictureBox1.Image = imgGray.ToBitmap();
            }
        }

        private void btnHSV_Click(object sender, EventArgs e)
        {
            hsvButton = true;
            RgbButton = false;
        }
    }
}


代碼示例:


using System;
using System.Collections.Generic;
using System.ComponentModel;
using System.Data;
using System.Drawing;
using System.Linq;
using System.Text;
using System.Threading.Tasks;
using System.Windows.Forms;
using Emgu.CV;
using Emgu.CV.Structure;
using Emgu.Util;

namespace emgucv_HSV_webcam
{
    public partial class Form1 : Form
    {
        #region Globle Var
        private Capture capture = new Capture();
        Image<Bgr, Byte> ImageFrame = new Image<Bgr, Byte>(320, 240);
        Image<Hsv, byte> imgHsv = new Image<Hsv, Byte>(320, 240);
        //Image<Ycc, byte> imgYcc = new Image<Ycc, byte>(320, 240);
        private bool hsvButton;
        private bool RgbButton;
        private bool YCbCrButton;
        #endregion
        public Form1()
        {
            InitializeComponent();
        }

        private void btnOpen_Click(object sender, EventArgs e)
        {
            Application.Idle += ProcessFrame;
            RgbButton = true;
            hsvButton = false;            
            YCbCrButton = false;
        }
        
        private void ProcessFrame(object sender, EventArgs e)
        {
            //flag = 0;
            if (RgbButton)
            {
                ImageFrame = capture.QueryFrame();
                ImageFrame = ImageFrame.Resize(pictureBox1.Width, pictureBox1.Height, Emgu.CV.CvEnum.INTER.CV_INTER_LINEAR);
                pictureBox1.Image = ImageFrame.ToBitmap();
            }
            
            if(hsvButton)
            {
                imgHsv = capture.QueryFrame().Convert<Hsv,byte>();
                imgHsv = imgHsv.Resize(pictureBox1.Width, pictureBox1.Height, Emgu.CV.CvEnum.INTER.CV_INTER_LINEAR);
                //可以追蹤黑色物件
                Hsv lowerLimit = new Hsv(88, 0, 11); //Hue:88,Satuation:0,value:11
                Hsv upperLimit = new Hsv(150, 255, 255); //Hue:150,Satuation:255,value:255                
                imgHsv.Resize(pictureBox1.Width, pictureBox1.Height, Emgu.CV.CvEnum.INTER.CV_INTER_LINEAR);
                //imgHsv.SmoothGaussian(7);

                //原始HSV
                //pictureBox1.Image = imgHsv.InRange(lowerLimit, upperLimit).ToBitmap();

                //做完中值濾波(非線性濾波)後,必須是大於1的正奇數 ---> 去除雜訊常用
                pictureBox1.Image = imgHsv.InRange(lowerLimit, upperLimit).SmoothMedian(3).ToBitmap();

                //做完3*3平滑 ---> 平均平滑
                //將每個像素替換為相鄰矩形內像素的平均值,以3×3大小的核心來說,每個像素權重是1/9
                //用這些像素的加總,替換當前的像素值
                //pictureBox1.Image = imgHsv.InRange(lowerLimit, upperLimit).SmoothBlur(3,3).ToBitmap(); 


                //Image<Gray, byte> imgGray = capture.QueryFrame().Convert<Gray, byte>();
                //pictureBox1.Image = imgGray.ToBitmap();
            }
            if (YCbCrButton)
            {
                Image<Ycc, byte> imgYcc = capture.QueryFrame().Convert<Ycc, byte>();
                imgYcc  = imgYcc.Resize(pictureBox1.Width, pictureBox1.Height, Emgu.CV.CvEnum.INTER.CV_INTER_LINEAR);
                //YCRCB膚色範圍
                //134 < Cr < 176 
                //97 < Cb < 142
                //80 < Y
                //Ycc(double y , double Cr , double Cb)
                Ycc lowerLimit = new Ycc(80, 134, 97);
                Ycc upperLimit = new Ycc(255, 176, 142);
                //在此範圍的 output 白色為所要之顏色,黑色為不落在此範圍之顏色

                pictureBox1.Image = imgYcc.InRange(lowerLimit,upperLimit).ToBitmap();
            }
        }

        private void btnHSV_Click(object sender, EventArgs e)
        {
            RgbButton = false;
            hsvButton = true;            
            YCbCrButton = false;
        }

        private void btnYCbCr_Click(object sender, EventArgs e)
        {
            RgbButton = false;
            hsvButton = false;            
            YCbCrButton = true;
        }
    }
}


最後一個是 灰階單通道

比較簡單就自己做吧~~


2016年9月14日 星期三

第一次作業_emgucv2.4.10版配置方法_HSV通道分割


opencv版本
可參考之前學長寫的簡單code

https://gist.github.com/anonymous/0ce6a32ddf6ebd5ce64e


==================================================================

這學期多學一個 emgucv 寫法


目標: HSV通道可分割!!!


這學期參考教學
官方文件:


Step1. 去官網下載 Emgucv2.4.10


選  zip 檔 解壓縮完 

放置C槽 取好指定目錄名稱  命名最好明確好辨認


Step2. 做dll配置

去系統環境變數設定PATH

打上 
C:\emgucv2.4.10\libemgucv-windows-universal-2.4.10.1940\bin\x86
C:\emgucv2.4.10\libemgucv-windows-universal-2.4.10.1940\bin\x64
依據你電腦的系統   做設定


有問題就換 x86

設好環境變數後   重啟電腦


新增好  WinForm 專案後做dll配置


對右側 Reference 按右鍵 Add Reference(添加參考)-->Browse 去

C:\emgucv2.4.10\libemgucv-windows-universal-2.4.10.1940\bin

把這三個dll加入

Emgu.CV.dll
Emgu.CV.UI.dll
Emgu.Util.dll


記住  在 bin 目錄喔!!!

這是最基本的三個   dll 檔案

可以讓你們開啟視訊做一些基本影像處理

如果後續有額外要做進階功能

就把剩下的都加進去

這裡我就先加  這三個  dll 檔


同學可以視情況  一般直接用內附的 pictureBox 就夠了


Step3. CvInvoke例外錯誤排除

為了避免  CvInvoke 出錯

EMGU.CV.Invoke Exception

這邊我們需要改變一下  是去組態-->組態管理員-->改成x64


Step3. HSV 通道分割  靜態影像處理


這裡視窗配置我先 拉 四個 視窗


我們再多添加一個 按鈕來讀圖


記得  pictureBox   的   sizeMode 屬性  設置為 StretchImage


讀圖的按鈕事件


Image(TColor, TDepth) Class


Image<TColor, TDepth>用兩個參數定義:Color和Depth
TColor类型TDepth类型
GrayByte
Bgr (Blue Green Red)SByte
Bgra (Blue Green Red Alpha)Single (float)
Hsv (Hue Saturation Value)Double
Hls (Hue Lightness Saturation)UInt16
Lab (CIE L*a*b*)Int16
Luv (CIE L*u*v*)Int32 (int)
Xyz (CIE XYZ.Rec 709 with D65 white point)
Ycc (YCrCb JPEG)


範例

        // 創建一張灰度圖 
        Image<Gray, Byte> imgGray = new Image<Gray, Byte>( 480 , 320 );
         // 創建一張藍色的圖片 
        Image<Bgr, Byte> imgBlue = new Image<Bgr , Byte>( 480 , 320 , new Bgr( 255 , 0 , 0 ));
        
         // 從文件創建Image 
        Image<Bgr, Byte> imgFile = new Image<Bgr, Byte>( " MyImage.jpg " );
         
        // 從Bitmap創建Image 
        Bitmap bmp = new Bitmap( " MyImage.jpg " );
        Image<Bgr, Byte> imgBmp = new Image<Bgr, Byte>(bmp);


===================================================================


通道分割函數方法


Image(TColorTDepth).Split Method

Split current Image into an array of gray scale images where each element in the array represent a single color channel of the original image


http://www.emgu.com/wiki/files/2.4.10/document/html/7b35099c-b411-06b1-561a-d8bedd33b4a7.htm


按鈕  按下觸發顏色空間轉換及通道分割事件


同學   之後可以練習看看   YCbCr  色彩空間轉換唷


再前幾篇有教過大家  RGB 分割   這篇是教HSV   方法差不多

加油~~


可以想看看  HSV   到底可以拿來幹嘛用的喔

這裡解決一些以前時常我會覺得疑惑的地方

到底  HSV 跟  HSB  差在哪裡
有些書上或文章這兩個都出現過

其實

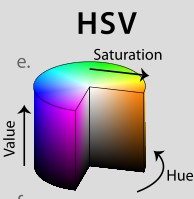
HSV當中的

H(Hues)代表色相(色彩)

S(Saturation)代表飽和度(深淺), S = 0時,只有灰度

V(Value)代表色調(明暗)也有人稱明度,表示色彩的明亮程度
也有人用 B(Brightness)表示


在概念上可以被認為是顏色的倒圓錐體(黑點在下頂點,白色在上底面圓心)


HSV(B)模型將亮度B(Brightness)變數由色彩變數中抽離出來,
也就是說色彩歸色彩,並不帶有亮度的成分,
因此混色時不會有加減亮度的情形發生。


HSV在用於指定顏色分割時,有比較大的作用
H和S分量代表了色彩信息


用H和S分量來表示顏色距離,顏色距離指代表兩種顏色之間的數值差異。


get hue value on mouse position


(0,480) ------>  抓取 Hue 範圍 後 藉由 Blob Detect 畫紅圓上去


之後的應用

Camshift的物件追蹤方法 可作為參考

http://www.slideshare.net/NoahChou/camshift

2016年9月12日 星期一

如何做視窗上不同視訊處理效果_針對不同按鈕

目標:


首先   新增一個專案


Tools
-->NuGet Package Manager
-->Manage NuGet Packages for Solution


去 sorforge  補下載

https://sourceforge.net/projects/emgucv/files/emgucv/3.1.0/


假壓縮完後


手動添加  UI  部分 組件的   dll


首先介面布局


四個  radioButton  一個  button

一個  emgucv 的  ImageBox


效果示意圖


程式碼

using System;
using System.Collections.Generic;
using System.ComponentModel;
using System.Data;
using System.Drawing;
using System.Linq;
using System.Text;
using System.Threading.Tasks;
using System.Windows.Forms;
using Emgu.CV;
using Emgu.CV.Structure;
using Emgu.Util;

namespace emgucv_exercise
{
    public partial class Form1 : Form
    {
        public Form1()
        {
            InitializeComponent();
        }

        private Capture _capture = null;        
        //Image<Bgr, Byte> frame;
        Mat imgMt;
        private void ProcessFrame(object sender, EventArgs arg)
        {            
            imgMt = _capture.QueryFrame();
            imageBox1.Image = imgMt;
        }
        private void btn_webcamOpen_Click(object sender, EventArgs e)
        {
            _capture = new Capture(0);
            _capture.SetCaptureProperty(Emgu.CV.CvEnum.CapProp.Fps, 30);
            _capture.SetCaptureProperty(Emgu.CV.CvEnum.CapProp.FrameWidth, 320);
            _capture.SetCaptureProperty(Emgu.CV.CvEnum.CapProp.FrameHeight, 240);
            Application.Idle += ProcessFrame;
        }

        private void btn_webcamClose_Click(object sender, EventArgs e)
        {
            _capture.Pause();
            _capture.Dispose();
        }
        
        private void rdB_Bchannel_CheckedChanged(object sender, EventArgs e)
        {
            Application.Idle += ProcessBgr_B;            
        }
        private void rdB_Gchannel_CheckedChanged(object sender, EventArgs e)
        {
            Application.Idle += ProcessBgr_G;
        }
        private void rdB_Rchannel_CheckedChanged(object sender, EventArgs e)
        {
            Application.Idle += Process_R;
        }
        //Image<Bgr, byte> imgBgr;
        //Mat capMat;
        private void ProcessBgr_B(object sender, EventArgs e)
        {
            Image<Bgr, Byte> imgBgr = _capture.QueryFrame().ToImage<Bgr, Byte>();

            //capMat = _capture.QueryFrame();
            //imgBgr = capMat.ToImage<Bgr, Byte>();

            for (int i = 0; i < imgBgr.Cols; i++)
                for (int j = 0; j < imgBgr.Rows; j++)
                {
                    imgBgr.Data[j, i, 0] = 255;
                    //imgBgr.Data[j, i, 1] = 255;
                    //imgBgr.Data[j, i, 2] = 255;
                }
            imageBox1.Image = imgBgr;
        }
        private void ProcessBgr_G(object sender, EventArgs e)
        {
            Image<Bgr, Byte> imgBgr = _capture.QueryFrame().ToImage<Bgr, Byte>();

            //capMat = _capture.QueryFrame();
            //imgBgr = capMat.ToImage<Bgr, Byte>();

            for (int i = 0; i < imgBgr.Cols; i++)
                for (int j = 0; j < imgBgr.Rows; j++)
                {
                    //imgBgr.Data[j, i, 0] = 255;
                    imgBgr.Data[j, i, 1] = 255;
                    //imgBgr.Data[j, i, 2] = 255;
                }
            imageBox1.Image = imgBgr;
        }
        private void Process_R(object sender, EventArgs e)
        {
            Image<Bgr, Byte> imgBgr = _capture.QueryFrame().ToImage<Bgr, Byte>();

            //capMat = _capture.QueryFrame();
            //imgBgr = capMat.ToImage<Bgr, Byte>();

            for (int i = 0; i < imgBgr.Cols; i++)
                for (int j = 0; j < imgBgr.Rows; j++)
                {
                    //imgBgr.Data[j, i, 0] = 255;
                    //imgBgr.Data[j, i, 1] = 255;
                    imgBgr.Data[j, i, 2] = 255;
                }
            imageBox1.Image = imgBgr;
        }

        private void rdB_Gray_CheckedChanged(object sender, EventArgs e)
        {
            Application.Idle += Process_Gray;
        }

        private void Process_Gray(object sender, EventArgs e)
        {
            Image<Bgr, Byte> imgBgr = _capture.QueryFrame().ToImage<Bgr, Byte>();
            Image<Gray, Byte> imgGray;

            imgGray = imgBgr.Convert<Gray, Byte>();
            imageBox1.Image = imgGray;
        }

        private void btn_H_Click(object sender, EventArgs e)
        {
            Application.Idle += Process_H;
        }

        private void Process_H(object sender, EventArgs e) //色相(H)、飽和度(S)、明度(V)
        {
            Image<Bgr, Byte> imgBgr = _capture.QueryFrame().ToImage<Bgr, Byte>();
            Image<Hsv, Byte> imgHsv;
            imgHsv = imgBgr.Convert<Hsv, Byte>();
            //.Convert<Hsv, Byte>()
            Hsv lowerLimit = new Hsv(0, 58, 40); //47, 0, 0
            Hsv upperLimit = new Hsv(35, 174, 255); //53, 255, 255
            //imgHsv.InRange(lowerLimit, upperLimit);


            imageBox1.Image = imgHsv.InRange(lowerLimit,upperLimit); 
        }
    }


}